Building your own PC is an empowering experience. It gives you full control over your hardware, saves money, and helps you understand how each component works together. But if it’s your first time, the process can seem intimidating.
In this guide, you’ll get a step-by-step walkthrough for assembling a desktop PC from the ground up — covering everything from installing the CPU to booting into the BIOS for the first time.
What You’ll Need Before You Start
Required Tools and Items:
- Phillips-head screwdriver (magnetic recommended)
- Anti-static wristband or mat (or ground yourself frequently)
- Clean, well-lit workspace
- All your PC components (CPU, GPU, RAM, motherboard, SSD/HDD, PSU, case, cooler)
Optional but Helpful:
- Cable ties
- Small flashlight
- Tweezers or pliers for tight spots
Step-by-Step PC Assembly Guide
🧩 Step 1: Install the CPU on the Motherboard
- Open the CPU socket latch on the motherboard.
- Align the triangle on the CPU with the triangle on the socket.
- Gently place the CPU into the socket (don’t force it!).
- Close the socket latch to secure it in place.
Important: Never touch the pins underneath the CPU or in the socket.
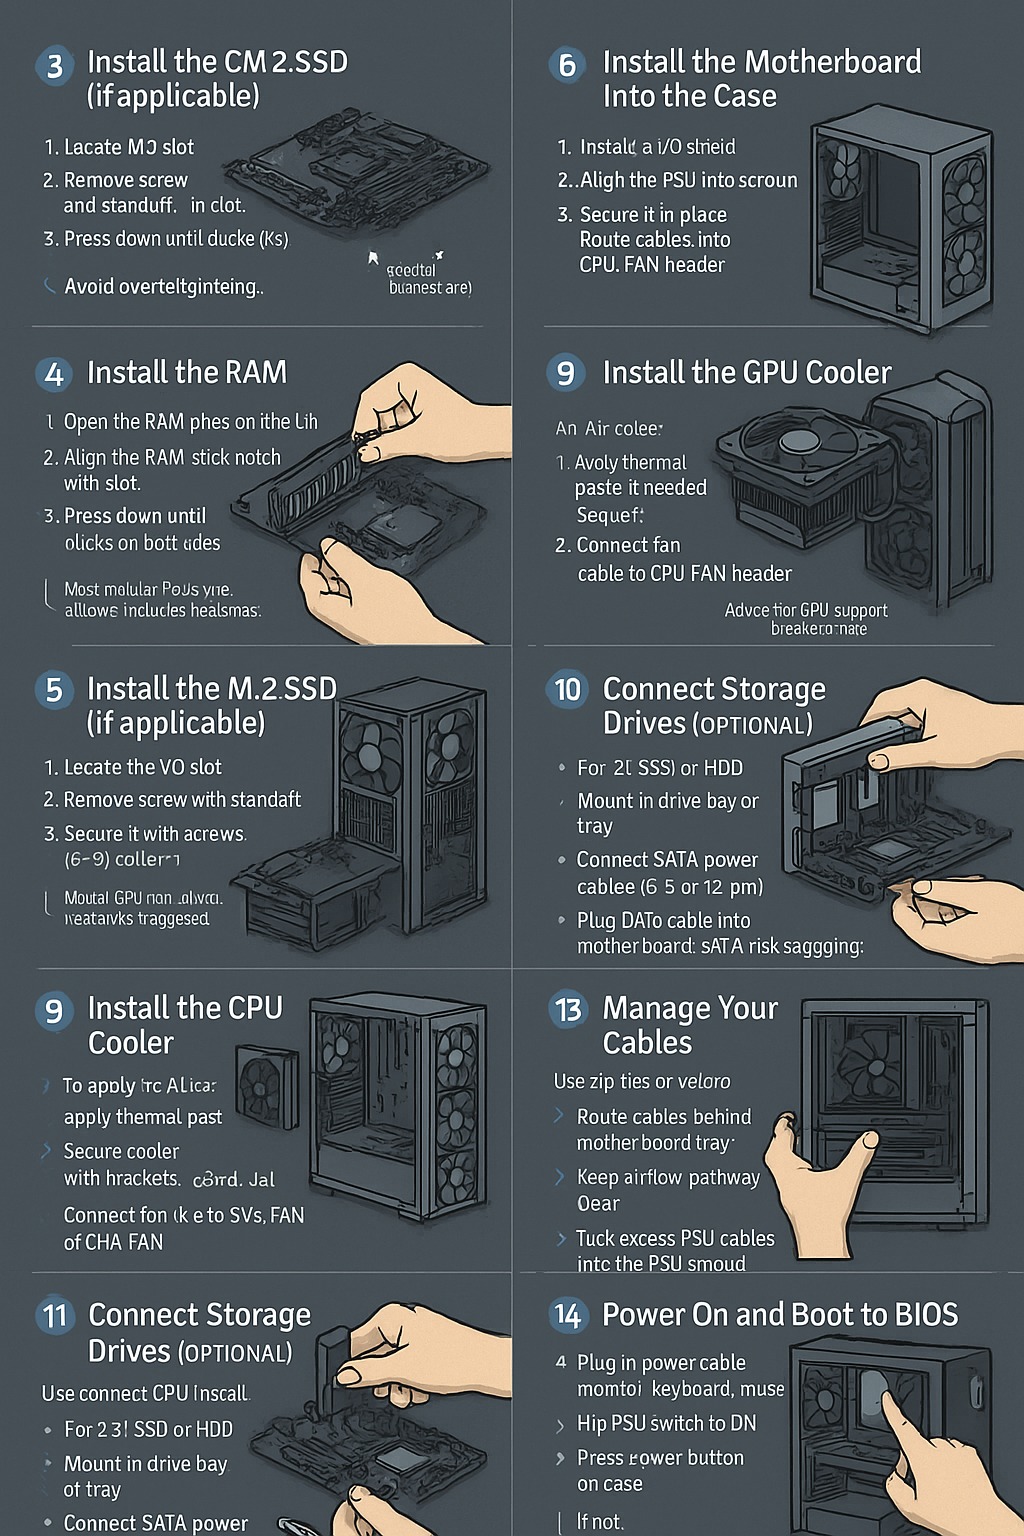
💾 Step 2: Install RAM
- Identify the correct RAM slots for dual-channel (check your motherboard manual).
- Open the retention clips.
- Line up the notch and firmly press the RAM module until it clicks into place.
⚙️ Step 3: Install M.2 SSD (Optional)
- Locate the M.2 slot on the motherboard.
- Insert the SSD at a slight angle.
- Secure it with a small screw.
Tip: Some boards include thermal pads or heatsinks — don’t forget them!
🖥️ Step 4: Mount the Motherboard in the Case
- Install the I/O shield in the back of the case.
- Line up the motherboard with the case standoffs.
- Secure it with screws (usually 6–9, depending on form factor).
Double-check that the motherboard is not touching the case directly.
🔌 Step 5: Install the Power Supply (PSU)
- Place the PSU into the bottom (or top) PSU bay.
- Secure it with screws at the back.
- Route the main 24-pin ATX, 8-pin CPU, and PCIe power cables through the case.
Use the case’s cable management channels if available.
❄️ Step 6: Install the CPU Cooler
If using air cooler:
- Apply a small pea-sized dot of thermal paste on the CPU (if not pre-applied).
- Attach the cooler using the provided mounting hardware.
- Connect the CPU fan header on the motherboard.
If using AIO liquid cooler:
- Mount the radiator to the top or front of the case.
- Attach the pump block to the CPU with thermal paste.
- Plug the pump and fans into the proper headers.
💡 Step 7: Install Storage Drives
- Mount 2.5” SSDs or 3.5” HDDs in their brackets or bays.
- Secure with screws or tool-less clips.
- Connect SATA data cables to motherboard and SATA power cables from PSU.
🧵 Step 8: Connect Front Panel Connectors
These include:
- Power Switch
- Reset Switch
- Power LED
- HD Audio
- USB 2.0 / 3.0 / USB-C
Refer to your motherboard manual for exact pin layout — it’s usually a small, labeled block near the bottom right of the board.
🎮 Step 9: Install the Graphics Card (GPU)
- Remove the appropriate PCIe slot covers on the case.
- Insert the GPU into the top PCIe x16 slot.
- Secure it to the case with screws.
- Connect PCIe power cables from the PSU (6/8/12-pin depending on GPU).
🔄 Step 10: Cable Management
- Route all cables behind the motherboard tray.
- Use zip ties or Velcro straps to keep them tidy.
- Ensure no cables are blocking airflow or fan movement.
This step improves airflow, appearance, and makes future upgrades easier.
⚡ Step 11: Double-Check Everything
Before turning on the PC:
- All power cables connected?
- CPU fan plugged in?
- RAM fully seated?
- GPU secure and powered?
- Storage connected?
- No loose screws inside the case?
First Boot: Accessing BIOS
- Plug in your monitor, keyboard, and mouse.
- Connect power cable and turn on the PSU.
- Press the power button on the case.
- Quickly press DEL or F2 to enter BIOS when prompted.
Inside BIOS:
- Check if CPU, RAM, storage, and GPU are detected
- Enable XMP/EXPO for RAM
- Set boot priority to your USB or SSD
If the PC Doesn’t Boot
Don’t panic! Common issues:
- RAM not fully inserted
- CPU power cable unplugged
- GPU or PCIe slot not seated correctly
- Front panel connector miswired
- Monitor cable plugged into motherboard instead of GPU
Try booting with just motherboard, CPU, one stick of RAM, and PSU connected (no GPU).
Final Thoughts
Assembling a PC is like building with Lego — with a little more care and attention. Once it’s done, you’ll have a deep sense of satisfaction and a custom machine built for your exact needs.
Building your own PC not only saves money, but gives you total control over your hardware and upgrade path. Once you complete that first successful boot into BIOS, you’ll never want to buy prebuilt again.